

The push jerk is one of the most dynamic compound exercises for building strength, power, and overall fitness. If you’re here, you’re likely curious about how this movement can transform your fitness journey. This comprehensive guide provides a detailed roadmap for safely and effectively mastering the push jerk, addressing your concerns and equipping you with the knowledge and technique to succeed.
What Is the Push Jerk?
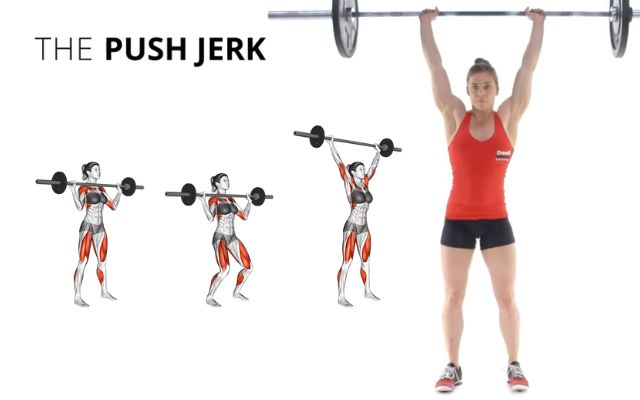
The push jerk is a complex movement that combines explosive lower-body power with precise upper-body control. It involves a powerful drive through the legs, followed by a seamless transition into an overhead lockout position. Unlike the split jerk, the push jerk keeps your feet grounded, requiring exceptional stability and coordination. This exercise not only builds strength in the shoulders and legs but also demands core engagement to stabilize the bar overhead.
How to perform a proper Push Jerk?
The push jerk starts with a solid foundation. Your feet should be in a squat stance, with weight distributed slightly toward your heels but keeping full foot contact with the floor. Hold the barbell in a jerk rack position, ensuring it rests between the throat and the top of the shoulders. This placement allows for optimal power transfer during the movement.
The explosive upward drive begins with a controlled dip, achieved by bending your knees while keeping the trunk vertical. The depth should be no more than 10% of your height, enabling a powerful rebound upward. As your legs extend fully, the bar accelerates upward, and the arms punch it into a stable overhead position. The final step involves sitting into a shallow squat, maintaining balance as the bar stabilizes overhead. Once secure, return to a standing position with the bar still locked out.
Push Jerk Steps:
1. Set Up the Starting Position
- Stand with your feet shoulder-width apart, positioned in your squat stance.
- Grip the barbell and rest it on your shoulders in the jerk rack position. Ensure the bar sits between your throat and the top of your shoulders.
- Hands should be as deep under the bar as possible, with a relaxed grip. Elbows stay in front of the bar and slightly out to the sides.
- Keep your chest up, core tight, and weight distributed evenly across your feet, leaning slightly toward your heels.
2. Dip for Power
- Begin the movement by dipping at your knees while keeping your torso vertical.
- Descend to a depth of about 10% of your height, ensuring the movement is controlled.
- Avoid leaning forward or losing balance during this phase.
3. Drive Up Explosively
- From the dip, push through your feet and drive upward with maximum force.
- Extend your legs fully, transferring power from your lower body to the barbell.
- Maintain a stable core and straight path for the barbell as it rises.
4. Punch Into the Overhead Position
- As the barbell reaches its peak, use your arms to push it upward and slightly back.
- Quickly punch your elbows into a locked overhead position, creating a strong and stable base.
- Simultaneously, drop into a shallow squat to absorb the barbell’s weight and stabilize.
5. Catch and Stabilize
- Secure the barbell in the overhead position, ensuring your shoulders, elbows, and wrists are aligned.
- Keep your core engaged and eyes focused forward for balance.
6. Recovery and Reset
- Stand up fully with the barbell still overhead, locking your knees and hips.
- Carefully lower the barbell back to the starting position in a controlled manner.
- Reset your stance and grip before repeating the movement.
Common Mistakes and How to Avoid Them
Mistakes in form can hinder progress and increase the risk of injury. A common issue is shoulder instability, often caused by improper hand positioning or insufficient shoulder mobility. Strengthening the rotator cuff and practicing overhead stability drills can mitigate this.
Wrist discomfort frequently arises from improper grip. A relaxed grip with hands positioned deep under the bar can alleviate stress on the wrists. Back issues are another concern, often stemming from a lack of core engagement. A strong, braced core is essential to prevent excessive strain on the lower back.
Finally, power transfer issues can disrupt the flow of the movement. Focus on generating force through the legs and maintaining a vertical trunk during the dip and drive phases to ensure an efficient transfer of energy to the barbell.
Beginner Push Jerk Workout Plan
Goal: Develop foundational strength, technique, and confidence with the push jerk.
Weekly Schedule: 3 days/week (e.g., Monday, Wednesday, Friday)
| Day | Warm-Up | Strength Focus | WOD (Workout of the Day) | Cool Down |
|---|---|---|---|---|
| Mon | Dynamic stretches, PVC overhead drills | 4×6 push jerks at light weight (40–50% 1RM) | 10-min AMRAP: 10 push jerks (light), 10 air squats, 200m run | Foam roll shoulders, hip flexor stretch |
| Wed | Band pull-aparts, barbell front rack mobility | 3×5 front squats, 3×5 push jerks at 50–60% 1RM | 5 rounds for time: 12 dumbbell push presses, 12 box step-ups | Child’s pose, wrist stretches |
| Fri | Arm circles, wall slides | 5×5 push jerks (progressive loading to 60%) | EMOM 10 min: 3 push jerks + 6 burpees | Pigeon stretch, shoulder rolls |
Intermediate Push Jerk Workout Plan
Goal: Build strength, power, and consistency in movement patterns.
Weekly Schedule: 4 days/week (e.g., Monday, Tuesday, Thursday, Saturday)
| Day | Warm-Up | Strength Focus | WOD | Cool Down |
|---|---|---|---|---|
| Mon | Resistance band mobility drills | 5×3 push jerks at 65% 1RM | 15-min AMRAP: 12 push jerks (moderate), 15 pull-ups, 300m row | Thoracic extensions, calf stretch |
| Tues | Overhead mobility stretches | 4×5 strict presses, 3×3 push jerks at 70% 1RM | 4 rounds for time: 9 hang power cleans, 9 push jerks | Lat stretch, wrist mobility drills |
| Thurs | Jump rope, scapular push-ups | 5×2 push jerks at 75% 1RM | EMOM 12 min: 2 push jerks + 4 toes-to-bar | Shoulder band stretches |
| Sat | Foam roll, kettlebell swings | 4×3 front squats + 3×3 push jerks at 75% 1RM | 5 rounds: 10 push jerks, 200m run, 8 handstand push-ups | Pigeon pose, quad stretch |
Advanced Push Jerk Workout Plan
Goal: Maximize strength, power, and competitive performance.
Weekly Schedule: 5 days/week (e.g., Monday, Tuesday, Wednesday, Friday, Saturday)
| Day | Warm-Up | Strength Focus | WOD | Cool Down |
|---|---|---|---|---|
| Mon | Barbell warm-up complex, dynamic stretches | 5×3 push jerks at 80% 1RM | 12-min AMRAP: 15 push jerks, 12 chest-to-bar pull-ups, 30 double-unders | Lat stretch, quad and hamstring rolls |
| Tues | Resistance band drills, jump squats | 4×4 split jerks, 3×2 push jerks at 85% 1RM | 4 rounds: 9 push jerks, 9 deadlifts, 200m sprint | Overhead band stretches |
| Wed | Scapular mobility, kettlebell work | 6×2 push jerks at 90% 1RM | 10-min AMRAP: 12 push jerks, 10 dumbbell thrusters | Child’s pose, T-spine mobilization |
| Fri | Overhead holds, dynamic barbell stretches | 4×5 front squats, 4×3 push jerks at 85–90% 1RM | 20-min EMOM: Odd – 5 push jerks, Even – 8 calorie bike | Shoulder dislocates, hip mobility |
| Sat | Jump rope, single-arm overhead holds | 1RM push jerk testing | Benchmark WOD: “Grace” (30 push jerks for time) | Foam rolling, recovery stretches |
Safety and Injury Prevention
Safety is paramount when performing the push jerk. A proper warm-up prepares your muscles and joints for the demands of the movement. Emphasize shoulder and wrist mobility exercises, as these areas are heavily involved.
Correct form is the cornerstone of injury prevention. Keep the spine neutral, the core engaged, and the movement controlled. Gradual progression is also critical. Start with lighter weights to master technique before increasing load. Listen to your body throughout the process, pausing if discomfort or pain arises. Finally, investing in quality equipment, such as weightlifting shoes and a sturdy barbell, can enhance both performance and safety.
Incorporating the Push Jerk into Your Routine
The push jerk can be adapted to suit various fitness levels. Beginners should focus on light weights and higher reps, emphasizing technique. A sample routine might involve three sets of eight reps, gradually increasing weight as form improves.
Intermediate and advanced lifters can integrate the push jerk into strength-focused workouts, using heavier weights for lower reps. This approach enhances explosive power and reinforces coordination. For a balanced program, pair the push jerk with complementary exercises like front squats and overhead presses.
The Benefits of the Push Jerk
The push jerk offers a range of benefits that extend beyond building muscle. By targeting the shoulders, triceps, and legs, it enhances both upper- and lower-body strength. The explosive nature of the movement improves athletic power, making it invaluable for sports and functional fitness.
Core engagement is another key advantage. The push jerk demands stability throughout the movement, strengthening the core muscles responsible for balance and control. Additionally, the exercise promotes shoulder strength and stability, reducing the risk of injuries in other overhead movements.
Exploring Variations and Alternatives
Variations of the push jerk allow you to target specific aspects of the movement. Adjusting your grip width can alter the emphasis on certain muscles. A narrower grip increases triceps engagement, while a wider grip shifts focus to the shoulders.
Equipment variations, such as using dumbbells or kettlebells, introduce new challenges and help improve balance and coordination. If the push jerk isn’t suitable due to mobility limitations or other concerns, alternatives like the push press or split jerk can provide similar benefits.
Conclusion
The push jerk is a powerful tool for developing strength, power, and coordination. By mastering its mechanics, prioritizing safety, and incorporating it into a balanced routine, you can unlock its full potential. If you’d like, I can help you refine your technique or create a workout plan tailored to your fitness level. Let me know if you’d like to take the next step, and we can discuss how I can support your fitness goals!